Manage your Account Settings - For Enterprise
Updated Dec. 11, 2025 by SupportThis guide will help you get your enterprise account in line with your company's branding, understand Authorized User Accounts, configure navigation access, and update your billing and resources based on your needs.
After logging in with your enterprise account, go to Enterprise Settings.
General Settings
This page is where the currently logged in user can change their name and account password, and also where the list of Authorized User Access list can be found.
Authorized Users - are the users that can access your enterprise account, it can be an admin or a colleague working on your company, or a stakeholder from another company that your coaching company is currently coaching. Authorized users have different permission types - Read, Edit, and Full.
Understanding Permission Types:
- Read (Read-Only) - Read-only permission is usually given to stakeholders, CEO, HR from another company/organization, that your coaching company is currently coaching or working with. This permission strictly limits the user to read/view records of the coachees that are under their organization for monitoring purposes.
- Edit - Can access edit data / records on the enterprise account, it has limited access to administrative settings listed below:
- Company information
- Company Logo
- Color Scheme
- Customize Email Messages
- Email Notifications
- Two-factor Authentication
- Notifications
- Full - Has full access to the account, can access the same as the owner of the enterprise account.
To add an authorized user:
- Click the "New" button aligned to the Authorized User Access header
- Fill up the form fields with the user's name, email address and permission type
- After submitting, an invitation will be automatically sent to the person's email address
- You can resend the invitation to the person by clicking the "Resend Invitation" button
- Assign read-only users to their organization.
Company Information & Branding (Logo & Color Scheme)
Update your company's information and branding for users, coaches, and coachees to easily identify your company.
Tips for Color Scheme:
- As much as possible, avoid using one color value for both Primary and Secondary fields.
- If possible check some of your account pages to ensure that the color scheme contrast with another.
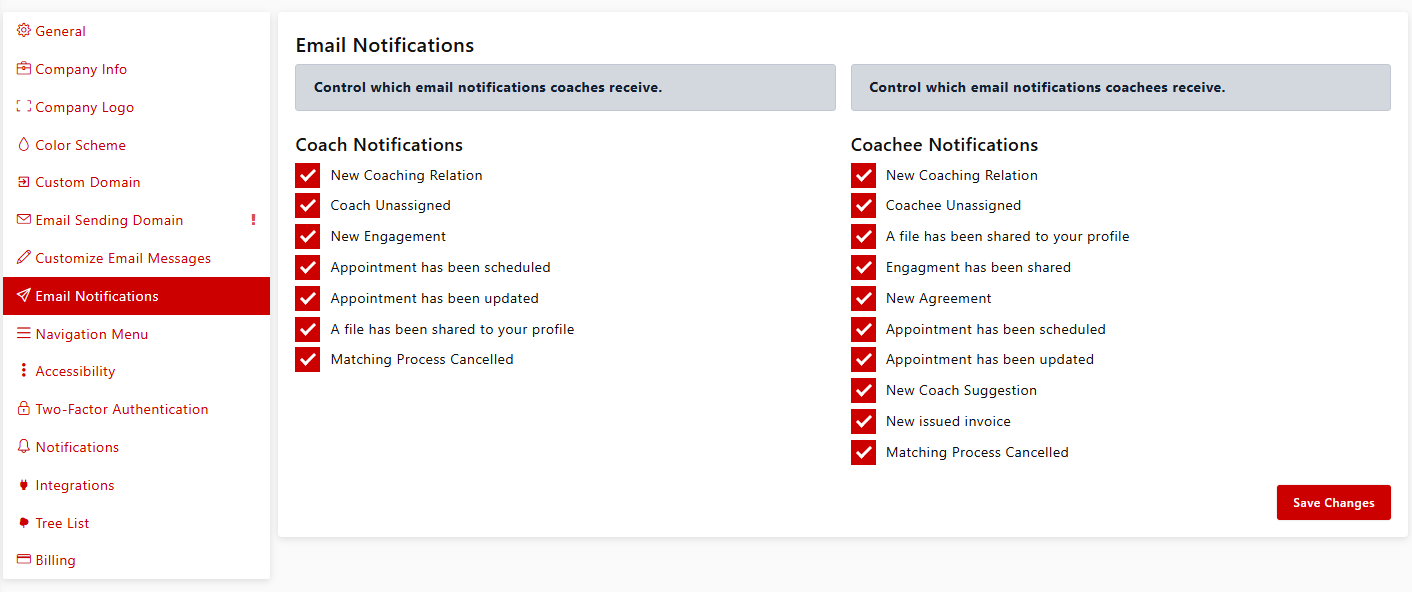
Email Notifications
This setting allows you to control email notifications that are being sent to the coaches and coachees when using the platform. This functionality is designed to reduce the volume of unnecessary email notifications sent from the platform, helping users manage communications more effectively.

Navigation Menu
This setting allows you to configure which navigation menu items will be available for Read-only Authorized Users (Stakeholders, CEO, HR, etc.), Coachee and Coach accounts connected to your enterprise account.
Accessibility
This setting lets you control which functions are available for you and your users on the platform.
Current settings that can be toggled:
- Session log data visibility
- Allow Coaches to add new Coachees
- Allow Coaches to create new Engagements
- Hide Coach Feedback Ratings
- Disable Rate per Hour fields
- Disable Availability Setting for Coaches
- Allow Coach and Coachees to access the Support Guide
- Enable Direct Matching Process
Billing
This page is where you can manage coach seats, display your next scheduled billing payment, and also see your payment history on Coaching Loft.
Managing Coach Seats
- If you add a coach seat during the trial period, your account won't be charged but instead, the total computed amount based on coach seat count will be billed after your trial period expires.
- If you add a coach seat after the trial period, your account will be charged right after you submit the changes. The immediate charge will be computed based on the number of remaining days of your next billing payment, the new total computed amount based on the coach seat count will be billed on your next scheduled billing payment.
- Removing 1 coach seat, on the other hand, will deduct $95 on your total monthly billing amount. This procedure is undoable - after you submitted the form, you won't be able to get back the seat that was recently deducted to your account.
Removing coach seats
To remove a coach seat, the seat must be vacant before it can be deleted:
- Go to Coaches.
- Click the Option button found beside the coach that you wish to remove, then click Remove.
- Go back to the Billing page in the settings, then click Remove unused seats.
- Specify the number of seats you wish to be removed then click Next.
- Review the summary and then click Proceed.
- Done


